Links to all the other related posts at the Robot Party Round-up.
I promised a tutorial on how I made The Boy’s UltraFab Robot Cake, so here it is… And honestly. It’s pretty easy.
Ingredients:
3 boxes of cake mix* and whatever ingredients they call for.
1 batch of cream cheese icing**
1/2 batch of no-cook fondant*** (edit: recommend this instead: marshmallow fondant recipe_)
food coloring****
Tools:
1 angel cake tube pan (Like This) for the body. This is deeper/larger than your average tube pan.
1 metal bowl (for the head)
Step 1 – Bake your cakes. I was lazy and just went the cake mix route.
Head: 1 box of the cake mix. I filled the bowl 2/3- 3/4 of the way full, and used the rest for some little cupcakes. Follow package directions but allow additional time for cooking the really thick bowl cake. Like 45-50 min. Insert toothpick in center to determine doneness.
Body: The body was done in the tube pan, and I used 2 boxes of cake mix to fill it. You don’t want to fill more than 3/4 of the way to the top, so if your pan is smaller than mine, put the rest into a 8 in round pan and just plop it on top of the other after they are cooked. Again, this is really thick so allow plenty of time in the oven.
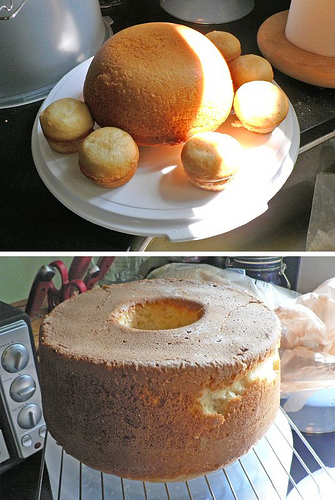
Originally I had planned to cut off the tops of both the bowl cake and the tube cake so they would sit flat, but i decided i liked the look of leaving them on.
Step 2 – Icing
Base:
Make up a batch of cream cheese icing. Tint to your desired color with food coloring.
When the cakes are fully cooled you can ice them. I started with the body, and just iced the sides and top (not the center of the cone) in my base icing. At that point I SHOULD have put the head on top, and iced it alread on the body. But i didn’t because i was thinking I was going to try wrapping the entire head in rolled fondant. But unless you are going to try similar, just go ahead and plop the head on the top of the cake, and ice from there. It’s much neater. It also helps to sit the whole thing on a lazy susan so you can turn the cake while you ice.

Decorations:
I decided to try my hand at making fondant and using that for decoration (you could also do store bought fondant, or just try decorating with candy). It worked ok, but I think my fondant was not as stiff as I would have liked, so I ended up improvising. I prepared a half batch of fondant, and separated it into three different balls of different sizes, which I then kneaded with food color.
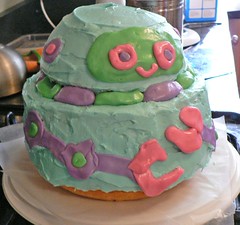
I first tried rolling some of the purple, and cutting out pieces that I then stuck on the cake. The arms were made this way (see above pic). Unfortunately, the fondant kept stretching and didn’t keep it’s shape well as i tried to transfer it. Probably with a better fondant, this would have worked much better.
So i got creative and started just shaping the pieces in my hand like playdough, and sticking them on. The hardest part was the face circle, which took me forever to get into some decent shape. The eyes, ears, joints, etc are all just flattened balls with smaller flattened balls stuck in the center.
To hide where i made a mess trying to transfer the already iced head to the body, i just used leftover fondant to make elogated balls, which i used to create his ‘collar’. This was an unplanned addition which i think turned out very well!
Let me know if anything doesnt make sense… this was alot of fun to make!
Related Posts:
– Robot Party Invites/Thank You Notes– Robot Cake and Party Favor Bags

*(I used Betty Crocker Super Moist Vanilla I think)
**(1 stick butter, 1 bar of cream cheese, 1 lb powdered sugar, vanilla). Google for instructions/recipe, or there will probably be a recipe on your box of powdered sugar.
*** (I googled for a really simple one that took a pound of powdered sugar, and halved it. Not including it because i wasnt thrilled with how it came out, so you’d do just as well to try any of them. You can also purchase pre-prepared fondant) edit: Use Marshmallow Fondant instead: marshmallow fondant recipe ..like I did for the Dragon Cake the next year)
**** (I used candy coloring for the fondant to get brighter colors, and regular liquid color for the base icing)