 For a party this weekend, I decided to make some little pies for appetizers.. You’ll have to wait til later this week to see what I fill them with, but here is how I made the tart shells… so easy, and inexpensive!
These can be used for small appetizers (anything you’d do with phyllo shells, for example) or mini desserts.
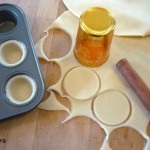
You’ll need:
- mini sized muffin pan(s) – My muffin pan is non-stick so I didn’t use any cooking spray or anything.
- Either a cookie cutter, or juice glass to cut out your rounds. This juice glass was about 2 inches in diameter, and was exactly the size i needed, but experiment, as the sizes of those mini muffin pans can vary. My muffin pan is non-stick so I didn’t use any cooking spray or anything.
- Pie Crust: I cheated on this one and used the store bought rolled pie crust (Like Pillsbury AllReady), but you can make your own pretty easily. If you use store-bought, I made about 50 shells from 1 package.
- Rolling Pin or something to roll out the dough with. I used this little dumpling roller that my mom brought me from asia somewhere, because I was already using the end of it to press the rounds down in the cups.
Instructions follow the photo gallery below. Click on a photo to view larger or as a slideshow.


Preheat oven or toaster oven to 400.
1. Unroll dough. You may want to roll it slightly more with your rolling pin, to flatten out the edges.
2. Cut out your rounds. They should be slightly larger in diameter than the top of your muffin cup, and when pressed down into it, come a little more than half way up the sides (see pics).
–Once you’ve cut all you can out of the pre-rolled out dough, press the scraps back together, and roll out again. Make sure the dough is rolled as thin as before, or a little thinner. Cut more rounds from that, and continue until you’ve used up all the dough.
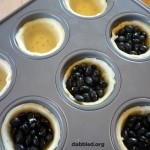
3. Press the round into the muffin tin, pressing down.
4. Poke holes with a fork in the bottom and sides of each cup (this is called “docking” the crust, and keeps it from puffing too much*)
5. Fill each cup with dried beans or other pie weights (Also keeps the crust from puffing as much. You can skip this step if you dock well, but I still found I got a nicer shape with the beans.)
6. Bake in ~400 degree oven for ~5 min. (Ovens, pans, and dough varies, try your first batch to confirm times. I did mine in my little toaster oven and this was what I used. You want golden tan color on the top and no burning on the bottom.
7. Let cool to touch and remove from pan, remove beans, let cool.
*you can also dock the crust prior to placing it in the cups, if that’s easier.
I’ll be doing more with these tomorrow, so stay tuned!